Eating Healthy is Easy!
 I love Sourdough Bread! But eating Gluten-Free means there’s not much bread in my meal-plan, unless I’m creative. This week I made an amazing Gluten-Free Sourdough Bread with Dairy-Free Coconut Kefir Water, and Coconut-Cashew Kefir milk. My mouth is still watering just thinking about it… And I’ve got a few leftovers still in the fridge!
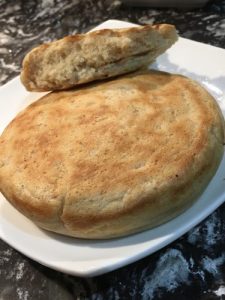
I’m always posting food pics on my personal Facebook page… and this week, my Gluten-Free Sourdough Pan Bread was extra fluffy, and yummy. I just had to post a pic.
After seeing the photo, a bunch of my friends all wanted the recipe. It’s rare that anything I cook ever looks or tastes the same for me twice. I don’t measure anything, and hardly ever follow a recipe. But thankfully I jotted down my ingredients for this one. Finger’s crossed if you decide to give it a try, I hope it comes out as tasty as mine did.
There is always the “easy way” and a little-more-complicated version. Of course I usually take the more complicated path… but you’ve got options. This Gluten-Free Sourdough bread recipe requires a little pre-planning to make your Sourdough Starter. (and if you’re feeling adventurous – there’s an extra step or two required to make your own Coconut Kefir Water, and Cashew-Coconut Kefir Milk.)
If you don’t want to go to all this trouble – zip down to your local health food store and buy PLAIN Coconut Kefir Water, and Kefir Milk. (If you get cow-dairy Kefir Milk, your recipe will not be dairy-free!) So keep that in mind depending on your dietary choices. Any plain Kefir milk will work – I like making my own, because it’s ridiculously easy, and I know that I’m getting live, probiotic rich, fresh food.
Yes, I’m aware that by the time you cook your Gluten-Free Sourdough Pan Bread, that the probiotic benefits are gone. But this is a part of what give it such good flavor, and makes it fluffy and bread-like, without egg, or added yeasts. I’m super-excited for you to try this and let me know what you think!
Because I did the totally homemade version – I can’t just share one recipe with you for this. There are actually 4 Recipes to follow! But I promise it’s not as complicated as it sounds – three of them are to get “starters” going. (and you can cheat and go the easy route for two of them.) But I want you to not only enjoy this awesome Gluten-Free Sourdough Pan Bread, but reap the extra benefits of having some Kefirs in the fridge. I use mine for smoothies and shakes, drizzle my Cashew Kefir milk over fresh fruit. Or just drink it! Heck I probably shouldn’t even share this, but one of my vices is Chocolate Hazelnut butter… This morning I used 1 T of Chocolate Hazelnut butter, and 1/4 Cup of my Cashew Kefir Milk, and spread/dipped my Gluten-Free Sourdough Bread in it. Along with a Banana and a handful of walnuts it was a power-meal!
If you want the print version of these recipes – CLICK Here for the PDF download for all 4 Recipes.
Gluten-Free Sourdough Pan Bread
This is a very yummy Gluten-Free, Dairy-Free, Egg-Free bread recipe, if you follow my recipe below and use a non-dairy Kefir Milk. But it will take a little pre-planning to have your ingredients ready to go. (especially if you choose to make your own fresh Kefirs, instead of buy them ready-made from the store. – it’s soooo worth it!)
Ingredients:
- 1/2 C GF Sourdough Starter*
- 1/2 C Cashew Kefir Milk** (or any plain Kefir dairy/dairy-free Milk) or use 1/4 C plain unsweetened yogurt + 1/4 C Water
- 1 tsp Baking Powder
- 1 tsp Baking Soda
- 1/4 tsp Pink Sea Salt
- 1/2 C GF Flour (Pamela’s All Purpose) OR I like using Quinoa Flour!
- 1/2 C Coconut Kefir Water*** (more or less to get a thick, batter-consistency.) I make my own, but if you’re wanting the easy way, buy a bottle at your local health food store. CocoKefir from GTS Living Foods brand is my fav.
Directions:
- Mix all ingredients together in a bowl.
- I like to use 2 one-egg skillets to cook my dough.
- You can add a little oil to your skillet and pre-heat. But if it’s a non-stick skillet it’s not necessary to do this each time.
- Place a spoonful of dough in the skillet, and spread it out to fill the pan.
- Cook on med-high heat until browned on one side. Depending on the heat and thickness of your pan-bread dough it might take 2-4 min. per side to cook.
- (This is where having 2-little skillets comes in handy…) Using your 2nd skillet, cover and flip bread to brown the other side.
- Cool on wire rack. Or Eat hot & fresh.
Portions above will make approx. 6 one-egg skillet rounds.
Once cooled, seal and store in fridge. Will keep 3-5 days in the fridge (if they last that long…) A toaster oven works great to toast/reheat and warm-them up to eat leftovers.
Gluten-Free Sourdough Starter
Ingredients:
- 1 Cup Gluten-Free All Purpose Flour Blend (Pamela’s, Bob’s, or other.)
- 1 tsp Sugar
- 1 Cup Coconut Kefir Water*** (plain flavor). CocoKefir from GTS Living Foods brand is great. Or start your own with my “Eating Healthy is Easy” Coconut Kefir Water recipe.
Directions:
- Mix these 3 ingredients in a Ceramic or Glass Bowl. Be sure your bowl is large enough to give your Starter room to expand without overflowing!
- Cover with a Cheese Cloth and leave out on the counter until it doubles. (overnight, 8-12 hours or more)
- It will be a little bubbly and smell “yeasty”.
- Cover with a tight lid and refrigerate until you need it.
I use 3/4 of my batch of Starter to bake: pan-bread, muffins, pizza crust, etc…
To Refresh Your Sourdough Starter:
- ADD 1 Cup Gluten-Free Flour and 1 C Coconut Kefir Water to the remaining Starter
- Cover with Cheesecloth and let sit out 8-12+ hours to replenish,
- Cover with lid, and Refrigerate. This will keep your Sourdough Starter going.
(Every 3-4 batches I’ll add 1 tsp of organic Sugar to my Starter. Sugar is helpful for the fermenting process.)
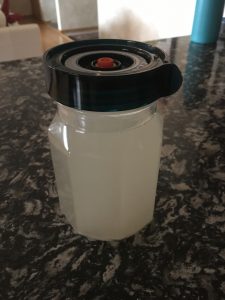
Easy Coconut Kefir Water
 You can buy Kefir Water Grains, and follow the directions, but here’s the easy way….
Ingredients:
- 1 Liter carton Coconut Water
- One – 8 oz bottle CoCo Yo brand – Plain Coconut Kefir Water
Directions:
- Mix together in a large mason jar.
- Cover with cheesecloth and a rubber band.
- Let sit out on the counter 12-24 hours
- Cover with a lid and refrigerate.
To Refresh Your Coconut Kefir Water:
Use the last 1/4 of what’s in your jar as the “starter” for your next batch, just add plain coconut water, cover with cheesecloth, leave on the counter overnight, and you’ve got a fresh and delicious batch refilled and ready to go! Aside from making bread, this is great to drink plain, add a splash of juice, or use as the liquid in your smoothies for a great probiotic boost.
(The lid on my jar in this pic is from Nourished Essentials, it’s designed specifically for fermenting, to let air escape.) If you’re wanting to make your own sauerkraut, or other fermented probiotic rich foods, these lids are great!)
Homemade Cashew-Coconut Kefir Milk
You can buy Kefir MILK Grains, and follow the directions to make Kefir Milk, but here’s MY easy way….
Ingredients:
- 1 C Raw Cashews – (soaked & drained)
- 2.5 Cups Coconut Kefir Water (More water = thinner liquid. Less water = thicker cream…)
- (optional) the powder from 2 probiotic capsules
Directions:
- Place all ingredients into a blender / Vitamix
- Blend on high to liquify (1-2 minutes)
- Pour into TWO Glass containers (32 oz Mason Jars, or something similar – or a bunch of little jars!)
- Cover with Cheesecloth, and a rubber band.
- Let sit out on the Kitchen counter overnight (8-12 hours) Your Kefir Milk will expand and might separate, during the fermenting process. Putting it in two jars will give it room to breathe. It might be a little bubbly with the nut milk on top, and water in the bottom of the jar. Once you’re ready to put it in the fridge, you can put it all in 1 jar, with a lid. Refrigeration will stop the fermentation process.
- Cover with a lid, and put in the fridge.
- Stir or shake before using.
- Will keep for 2 weeks or more in the fridge. (I use the last ¼ of what’s in my jar as “starter” for my next batch!)
Final Thoughts:
I know that this all seems like a lot of work for Gluten-Free Sourdough Bread. But trust me, it’s worth the effort. I hope you’ll give it a go! Eating healthy is easy, but it does take a little effort. I’d love to hear what you think about all four of these healthy-for-you recipes.
To get the print version of these recipes – CLICK Here for the PDF download for all 4 Recipes.

0 Comments